Saturday, November 1, 2014

Counting Down to the Biggest Shopping Day of the Year

I'm officially starting my countdown to the biggest shopping day of the season. Each day I'll be posting a fun and unique gift idea that might help you all with a great personalized and hand made gift you may like to give this year. Today I'm showcasing my "Family Established Pillow" I can make the cases to be about any type of material and/or colors that you would like. Prices will range from $30-35 depending on the length of name. These samples pillows are 12"x16" pillows. 


If you are interested in having a pillow like this made for you, please contact me with your special order via email at Corrina.dea@theunlimitedstitch.com or message me on Facebook at www.facebook.com/TheUnlimitedStitch.

Sunday, February 10, 2013

Oversized Cloth Checkerboard

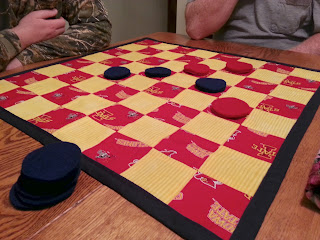
My family likes to eat at Cracker Barrel and when it's nice outside we usually play a game of checkers out on their front porch after dinner with those big oversized checkerboards. Well I got inspired one day that something like that would be a great gift for my dad and father-in-law for Christmas.  They both like to play games and I thought something like this would be great to play with their grandkids as they are just getting old enough to understand the rules of the game to play.  Of course I'm one for a challenge to "make" it myself instead of buying it, so I came up with a design and created customized cloth checkerboards for them.  I love how they turned out because they were big and soft, it was less likely to get banged up and checkers to be stepped on if they got thrown all over the place.


For my father-in-law I made an Iowa State themed board with navy and red felt checkers.  Now I was pretty limited on the amount of Iowa State fabric I had so the red squares are kind of random with the logos on them, but if I had plenty of fabric I would have lined up the IA State and Cy in the middle of the squares.  It was my first attempt at "quilting" and found that it is very tricky making 64 perfectly square pieces and sewing them to be all the right sizes to line up together.  When I was done attaching all the pieces together I ironed out all the seems and ironed on some light weight interfacing to the back.  Then I added a square backing piece and made some quilt binding to finish off the edges.  I wanted to order oversized checkers but couldn't get them in time for Christmas so I cut out double pieces of felt and used Tacky glue to attach them together.  This made them nice and thick plus the glue hardening helped add some rigidity to the pieces. 


My dad is a big hunter and lives in a log cabin so it was only appropriate to make his board camo and blaze orange.  The second time around I got a little better at things and got my technique down a little better.

They were a big hit and the kids LOVED playing with their grandpas!

Monday, February 4, 2013

Garden Fairy Birthday Party


This year for my daughter's 6th birthday she wanted a Fairy Garden Party.  It was a little challenging creating an outdoor feel in the middle of winter but I think we did a pretty good job and all the girls had a wonderful time.  I didn't really go with the Disney Fairy theme, but I borrowed some concepts from it.  Essentially the party was designed around visiting different fairy areas with fairies that had different talents.  We encountered flower fairies, light fairies, pixie dust fairies, baking fairies and of course I did have to throw Tinker Bell in there.

When the girls showed up they made their way to the "Flower Garden Room" which was our living room that I decked out in all the spare silk flowers I had in my house and in storage.  I actually got to use my wedding flower arrangements again that I wondered if I would ever use again 10 years ago!
In the middle of the floor I had a card table collapsed with some paper sacks and flower/butterfly foam stickers for them to use to decorate their bags.  


Once all the guests arrived we gathered around and I read them a letter that Tinker Bell had left for them.  She told them to truly enjoy fairy land they all needed to look the part so she had fairy skirts and wings for them to wear and flower wands.


I made tulle fairy skirts from 6"x 24"sized strips of tulle that I tied around 3/8" elastic.  I used mostly white, but added in a few pink, purple and green strips.


The wings were constructed of two wire hangers with the hooks straightened out.  I cut out hanger shaped pieces out of organza, turned them right side out then sewed up the edge.  The straightened hooks then overlapped and had more organza wrapped tight around them with an elastic strap secured inside to help make the arm bands.  Then I used some fabric glitter to make the sparkly swirls.


To make the flower wands I bought colorful silk flowers which I popped the tops off.   I hot glued the short stubby end left on to a painted wood dowel then wrapped the "stem" lightly with white ribbon leaving about 12" on each end to create the curly Qs.  Finally I tied thin strips of tulle around the base of the flower to hang down.


I decorated our stairs with Christmas lights, tulle, and tissue paper butterflies left over from the "butterfly party" a few years back.


Next I decorated the hallway down to my daughter's room (AKA the Pixie dust room) with strips of Christmas lights and poly stuffing along the way to look like little clouds.


In the "Pixie Dust Room" I had a little garden arch set up that I decorated with Christmas lights and tulle and an elevated chair covered with green earthy material for the girls to sit on while I painted their nails with sparkly nail polish.


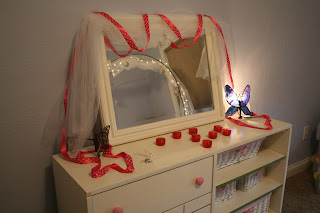
On my daughter's dresser I had homemade body glitter set up for them to adorn themselves with.  I found little travel containers at Walmart to hold the home body glitter which was made up of aloe vera gel with fine glitter mixed in it.


They used little Q-tips to spread it on their faces, hands and where ever else they wanted their pixie dust!!  It was so cute how they gooped it all over themselves.


Our next activity was to visit the Light Fairies room and create rainbow catchers.  I had cut out flower outlines out of construction paper leaving a circle in the middle.


The party room all ready for fairies to get their energy from sweet treats.


I used a banner I made a couple years ago for a princess party and borrowed some big fluffy tissue paper flowers from a friend to hang on the wall.


Fun fairies hung from the light fixture over the table.

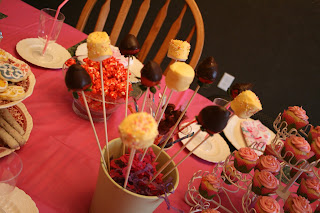
Tinker Bell and other fairy dolls decorated the table with all the sweets we had...little fairy iced cookies and candy coated wand pretzels.

 
Chocolate covered marshmallows make perfect fairy treats.

 
Mini cupcakes in flower petal cake papers (got them at Walmart) and then swirled the frosting in a little cake decorator kit to make them look like little roses.

 
No pixie party is complete without pixie sticks and sweet Jello-flavored popcorn.

Each place setting was set up with a piece of scrapbook paper that looked like grass and then topped with some pretty plain white china I had ( you could use paper plates as well) and then a butterfly napkin and little plastic champagne glasses with pink straws.


This party was so much fun and all the girls had an amazing time....especially my little Tinkerbell!!!

Friday, January 4, 2013

I Can Count Banner

This is one of my new favorite sewing creations of mine.  A wonderful lady who bought a quiet book from me last year made a special request for me to come up with an "I Can Count" banner for her son for Christmas this past year.  She said he really liked trucks, busses and trains so I thought of making a transportation themed banner.  The banner is 20" x  24" in size and can be hung up with a wooden dowel.  The base part of the banner is made up of two thicknesses of heavy felt with a thin ribbon separating each numbered section.


I designed each of the little pieces so that they would fit in the designated spaces.  I wanted a lot of detail to really make this piece a lot of fun.   Once I got the patterns made and cut out all the little pieces of felt I sewed small pieces of velcro on the backside of each piece with the opposite side of the velcro in its corresponding spot on the banner.  I made the grabby side of velcro to be on the banner so that the pieces wouldn't mess up the rest of the banner if it got stuck out of place.  I attached the top detail pieces on the Velcro-ed pieces with tacky glue to give each piece a bit more rigidity when it dried.

Here are each of the pieces up close:


At the top I attached loops for a wooden dowel to be used to help hang it on the wall.


To hold all the pieces when they are not on the banner I created a little pouch that can be hung from the underside of the banner with velcro.  My customer's son really like Thomas the Tank so I made the pouch of that material.


When the pouch is not in use, there are pieces of velcro on the back of the banner that it can attach to.  Also the pouch is set up to be able to close so that the pieces can be kept nice and safe inside when it is not attached to the banner.


If you are interested in my creating a banner like this for your little one, please feel free to contact me via email at corrina_dea@yahoo.com.  This banner sold for $75 because of it's very detailed pieces, but I can definitely make more simple pieces for a little less expensive piece.  I would love to customize a banner for your little one to include their favorite things so please let me know if you are interested.

Thursday, November 8, 2012

New Large Quiet Books Ready for Sale

Just finished up the final details on 6 more quiet books.  All of these are my larger sized books (9 1/2 x 10"), but I've only made two books that are 16 pages and then four books that are each 8 pages long.

If you are interested in ordering any of these books, check out my Things I Like 2 Make shop on Etsy.com.

Pink/Brown Modern Dot Cover - 16 Page Book


Shark Cover - 16 Page Book


Green/Orange Striped Cover - 8 Paged Book


Pink Striped - 8 Paged Book


The other 8 page books that I have for sale feature the same pages as the two above, but sport these two fabulous covers.


If you are interested in a custom designed book for your little someone special please let me know as I am taking orders for 2013.  With baby coming soon, I'm taking time off before the holidays to snuggle up with my new little one and two adorable older kiddos.  Email me at corrina_dea@yahoo.com.