Thursday, September 29, 2011

LIghting McQueen Birthday Party


For my son's 3rd birthday he wanted a Lightning McQueen themed party.  We decided to host his party at the local park because it had great play equipment for all ages and great FREE shelters to utilize.    We decorated the shelter with some posters I drew up and painted for the special day and bright red balloons.

We covered the tables with red plastic table clothes and put a checkered flag twisted streamed down the middle.


For gift bags for each of the kids, I used ordinary brown lunch sacks.  I then drew and painted the Cars logo and wrote in each of the kids' names on the bag.  


Each sack was filled with a personalized rice crispy treat, a Cars fruit snack treat, some sweeties, and a self made packet of sidewalk chalk.  


The key component to this party was having the Lightning McQueen cake.  I looked online for ways to make a 3D one and they all used marzipan to cover the cake and I just didn't want to mess with that.  I made this cake with one 9x13 cake and 4 cupcakes.  For the body of the car colored my own vanilla frosting with about a half a bottle of red food coloring.  I used chocolate frosting on the cupcakes and sprinkled them with black colored sugar.  Then used white and yellow tinted vanilla frosting with an accent decorator to do the embellishments.  Lightning's eyes are blue M&M's with dots of chocolate frosting on them.    See step by step how I made my Lightning McQueen cake.


On the back I wrote Happy Birthday, and instead of Lightning's signature 95 number I put the number 3 since it as a 3rd Birthday Party.


Most of the time we let the kids have free play since we were at that park but I did have a few activities planned.  One of them was pin the headlight on Lighting McQueen.  I drew up this little poster and painted it with craft paint.  I mounted it on some heavy duty cardboard and stapled it to the shelter's post.   We also played an English favorite - Pass the Parcel.  I wrapped up 15 pieces of candy in separate layers of a package and the children pass it around in a circle.  When the music stops, the child holding the package gets to open up one layer and get a sweetie.  The game keeps going on until the prize in the middle is unwrapped.  We also attempted to have some water balloon games but with kids (and adults) that can be quite unpredictable in nature so it turned into more of a water balloon fight instead which was great.


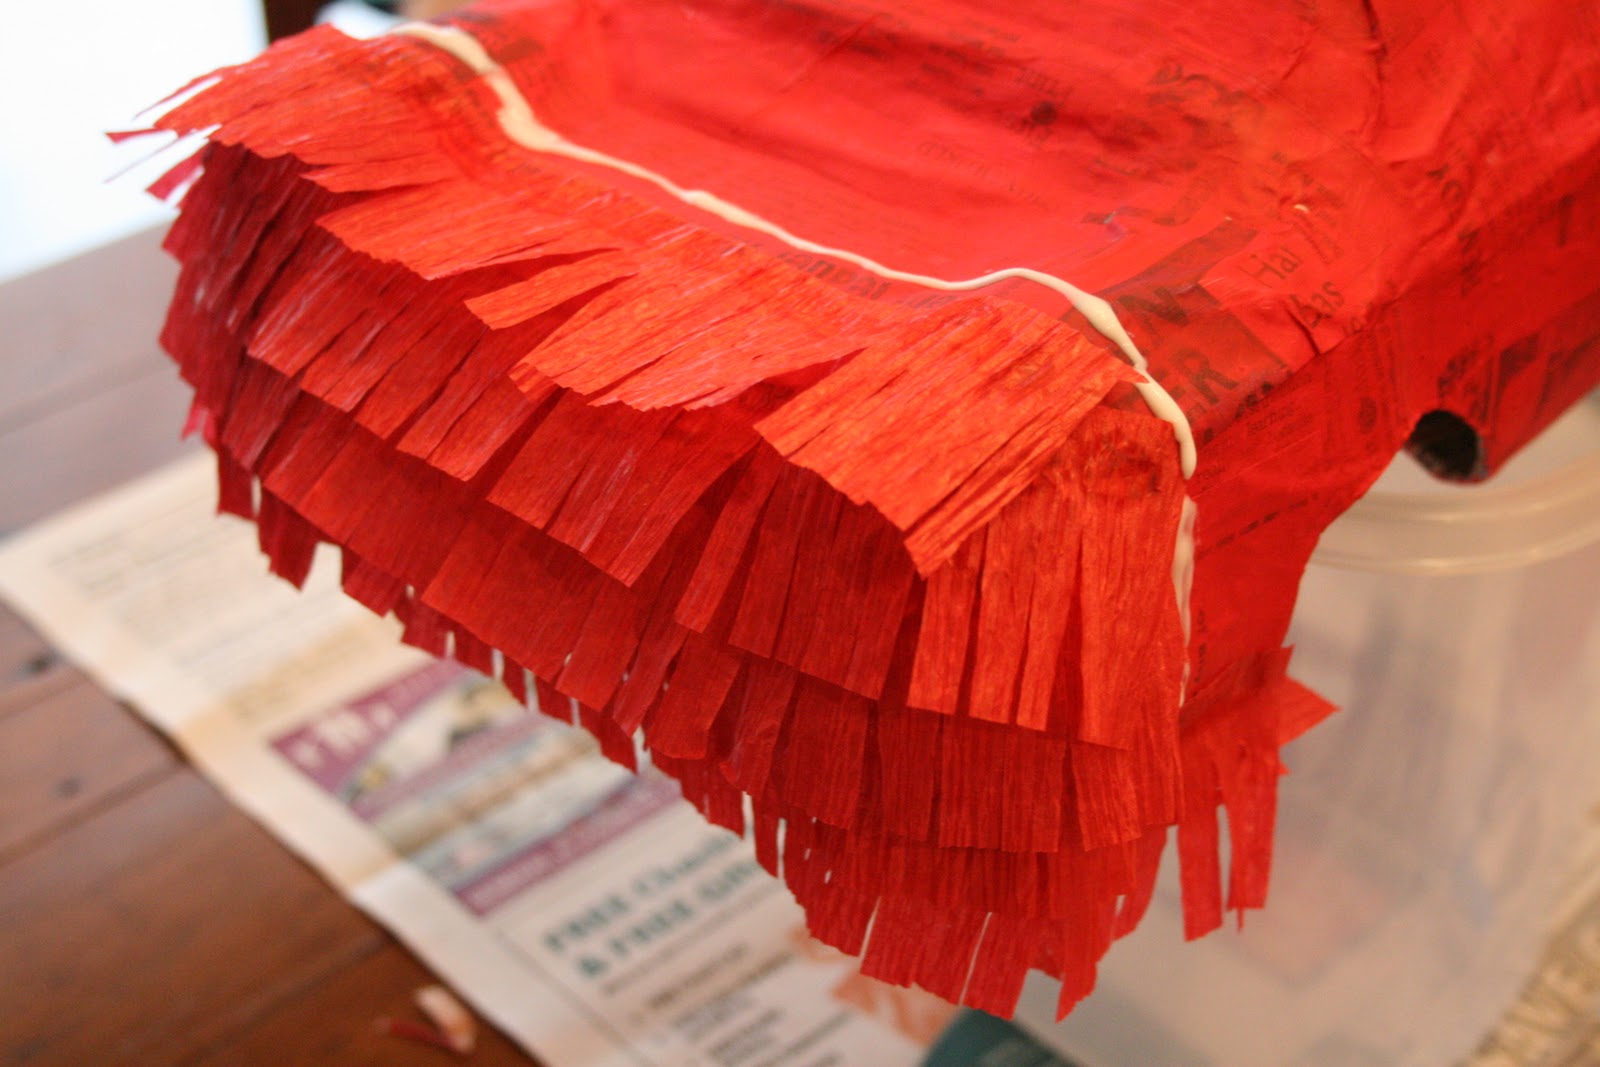
Of course a birthday party wouldn't be complete without a pinata and in true "Corrina fashion", I decided to make my own Lightning McQueen pinata instead of spending $20 for one.  I like the pull string pinatas because then I don't have to worry about people swinging baseball bats around.  Unfortunately, the second string pulled opened up the pinata and my son went for the plastic baseball bat anyways and started wacking away at it to empty out the goodies.  Click here to see step by step how I made the Lighting McQueen pinata.

For food, we went really simple.  Since the party was from 4PM on we decided to cookout at the park. We brought down our own gas grill and cooked up burgers and hotdogs.  I made up a crockpot of a mixed bean salad, a bowl of crab salad, cut up fruit and veggies with dip, and chips.  For sweet goodies we had red (Lightning), blue (The King) and green (Chick Hicks) decorated sugar cookies along with our Lightning McQueen cake and some extra cupcakes!

It was a great party and we really lucked out that the weather was warm and comfortable and sunny with a few clouds.  Contingency plan would have been to try having it at our house, but my extra prayers to God sure paid off on this amazing day!

Make Your Own Lightning McQueen Pinata


I made this Lighting McQueen pull string pinata for my son's 3rd birthday party.  I had seen ones in different stores any where from $18-22, but I was able to make this one essentially for FREE as I only used items I already had around my house.  Let me tell you how I made it....

Materials:


Car body:
1 cereal box (I used the smaller sized Kix box)
1 Kraft Mac and Cheese box
1 small gelatin box
1 styrofoam meat tray
1 Crystal Light plastic oval container
4 empty rolls from packer's tape
left over packers tape
black marker
heavy duty scissors

Paper mache:
newspaper cut in 1" strips
1 part flour
1 part water

Decorations:
Red craft paint
Black craft paint
Yellow craft paint
Roll of red streamers or crepe paper
scissors
glue
a few sheets of white paper/card stock
cellophane tape
20 - white 1/4" wide ribbon cut at 36" each 


 Directions:


Line up the tape holders on the sides of the cereal box where you want the wheels to be placed.  Use a permanent market to outline on the side of the box.


Then using the tape rolls I marked out on the bottom of the box how deep in I wanted the wheels to go.  I also mark out 3 sides of a square in the middle of the box for your trap door.   


Then I cut along the lines. I saved the intact cut outs for the wheels and continued to cut around them to create circles to later use for the side walls of the tires.  Next I used an exact-o knife to cut the trap door. You don't want to trim this up any as you need a good tight fit on the door so the sweeties won't fall out later.


Next to get some curve in the front I taped on the Crystal Light container.  To create the top of my car and front windshield, I propped the styrofoam meat container on top of the gelatin box and taped that into position.


Next I loosened the ends of the the mac and cheese box to be able to bend it into a parallelogram.  I taped it into that fixed position with some extra packing tape.  This is my back spoiler for the car.


I tape the spoiler into position at the back of the cereal box.  Next I filled some of the empty gaps between the meat tray and the mac and cheese box and in the front windshield area with some scrunched up newspaper.  (Not pictured here: but I did build up some humps on either side of the hood to give Lightning a little more curve.  See below in paper mache picture to see curves). Then I used some more packing tape to smooth out the lines around the car a bit.

Next I cut up loads of 1" wide newspaper strips and made up a 1 part flour: 1 part water paper mache mixture.

I dipped the newspaper strips in the flour/water mix and scrapped it off.  Then laid the strips across the box to really smooth out Lightning's body.  This step might be a bit overkill, but I wanted a smooth surface to paint my undercoat of red and it strengthens up all the little pieces put together to make the car's shape.  Plus it helps to strengthen the underside of the car where all the cutting out was done.  I propped this up on a colander on some newspaper to help keep it off the table.  Let the paper mache dry overnight for best results.

Next I painted the whole car a cherry red color with regular craft paint to help cover up all the newspaper and help have a base color when I put on my frilled streamer paper.  Let the paint dry as directed on your paint.  You could also use red spray paint, but the craft paint is what I had at home.  Also pain


To make the frilled paper to cover the car with, I took a roll of red crepe paper streamers and folded it over on itself about six inches long.  I would it over about 6-8 times and then cut it off.


Next I would cut about 3/4 of the way up about 1/4" wide slits all the way across the paper.

I started underneath the car I started by running a bead of glue across the width of the car and then attached a strip of the frilled paper and cut if off at the side.  Then ran another bead of glue about 1/2 above the last strip and attached another piece.


I continued this all the way up around the front of the car, on top of the hood and rest of the car.  

Once I got to the back of the car I turned the frilled edge around so it would point downwards opposite the way the rest of the car was.  I continued it down and underneath the car to the trap door opening.


To prepare the pull strings on the trap door I started with the real pull string.  I poked a small hole in the trap door near the edge.  I thread the string through from the inside of the trap door out and tie (may have to double tie) a big knot to keep it in place on the outside.  

Then I secured the real pull string back into a random position and secure it down with a small piece of cellophane tape.  Then with the rest of the other "fake" strings, I attach the very ends of them with a small piece of tape in a nice line along the trap door.  Make sure that the little pieces of tape don't overlap each other so they can be pulled off clean and not affect any other strings.  


Also allow about 3/8" - 1/2" between the taped rows so that you can glue down a small strip of the frilled paper to help disguise the strings.    This is a little bit of a tricky step so I wanted you to just be aware of it when you try to do it yourself.  When all the strings are attached turn the car upside down and grab the strings, trim them off at the bottom so that they are all even.


Next I attach the wheels that I created by filling in the tape rolls with newspaper.  I took the cardboard cutouts and glued them to the outside of the wheel while taping the back side of it closed with newspaper inside.  Finally I painted them black and let them dry.  


Now that the car is covered with red frilled crepe paper and the strings are in place you can glue the wheels in place.


Now for the finishing touches....  I drew out the side lightning bolts, Lightning's face, and headlights on white paper and painted them.  Once they were dry I cut them out and glued them on to the car.


I painted the red hub caps on the outside of each of the wheels.


I poked two small holes on either side of the car just above the front wheels.  I fed through some thin yellow twine about 5 foot long.  Then in the back I poked some tiny holes through the back spoiler to feed through a 3 foot piece of twine and tied it in a knot with the rest of the length to tie up with the front piece to make a pyramid point at the top to later attach the main rope to when it comes time to hang it up.  I also had a CARS sticker book that I found the Rusteeze, 95, and lucky lightning bolt to put on the car, but you could draw and paint these as well.


Finally, fill up the car with sweeties.  I had enough room for about 2 lbs of a candy mix. 

When it comes to party time, attach a thicker rope to the connected strings and hang it up over a rafter or a tree branch, etc.  Have the children line up and pull off one string at a time until it opens up and sweeties drop from the sky.

Homemade Lightning McQueen Birthday Cake


For my son's 3rd birthday party, he really, really wanted a Lightning McQueen birthday cake.  I searched the web for ideas on how to make a 3D Lightning cake, but they all used a marzipan layer on top, but I wasn't really familiar on how to use that so I wanted to go a more traditional icing route.  I think it turned out great and now that I've sorted out how to make it all work it will be easy to replicate.


I started out by making a cake mix in a greased and floured 9x13" pan.  Bake according to box's instructions and let cool on cooling rack.


Then I wrapped the whole cake in cling wrap twice and then put the whole cake in the freezer for at least 45 minutes (you could do it overnight as well).  Freezing the cake helps firm up the cake so that it is much less crumbly when you cut it.


Then using a serrated knife I cut up the 9x13" cake into the pieces I needed to make the car.  I cut one large rectangle 7x10."  That left a 9x3 piece (on the right above) and a 10x2" piece (on the top above).
From the 9x3" piece I cut it to be about 6 inches long (this will be used for the top of the car and angled a bit to make the windshield.  From the 10x2" piece cut it to be about 6" long as well and then cut it in half at an angle to create two triangular strips.  Use of the triangular strips lay behind the "windshield" piece and then stand the other piece up on end to make the spoiler.  From the corner pieces that are left, cut those in half in triangular pieces and use the rounded outside ends to create the rounded wheel fenders for the front hood on each side.


To assemble put a layer of icing on top of the 7x10" rectangle and assemble the cut pieces on top.  I would recommend securing the back spoiler with some toothpicks in the back.


A front view of the car cake


Next cut out the holes for the wheels.  With regular sized cup cakes you'll want to cut holes about 2 1/2" tall and 2" deep.  Then wrap up the cake in cling wrap and stick back in the freezer for about 40-45 more minutes. (NOTE: I had already started icing the car cake before I cut out the wheels as I was making this all up on the go, so it would have been better to cut the holes first and then stick it back in the freezer to firm the cake back up again to put on my crumb layer of icing.)

While the car is in the freezer, you can coloring your icing.  I used about 1 1/2 containers of vanilla icing in which I used A LOT of red food coloring.  NOTE:  the food coloring will change the consistency of your frosting to a little more liquidy.  I think homemade cake icing would be more ideal as you could keep adding more powdered sugar to it to firm it up.  I think you could do the same with the store bought frosting as well to firm it up a little.

When you take the car back out of the freezer, you will used about half of your colored icing to apply a crumb layer.  Take a few strips of waxed paper and place them slightly under all the edges of your cake to keep your cake plate protected (you will remove these later).  Then take an icing knife and spread a thin layer of icing to "seal up" the cake.  Place the cake back in the freezer for another 40-45 minutes to harden up the crumb layer of icing.


When the crumb layer is chilled, take the cake out of the freezer and apply the final frosting layer.  Use the icing knife to create a flat surface at the windshield and smoothed flowing lines to shape the car.


You will also want to freeze 4 regular sized cupcakes (I just made up a second batch of cake mix to make these and have extra cupcakes for the birthday party).  When they are firm from the freezer, you can take a metal melon baller and cut out holes on the top.  Also remove the paper wrappers from each cupcake.


Frost the cupcake tops with chocolate frosting and sprinkle them with black colored sugar.  After removing the waxed paper from under the final iced cake, carefully position the cupcake wheels in the cake.  (NOTE: your fingers will get gooey with this step, it is inevitable.  Don't worry because you can touch up the frosting later and sprinkle on some more sprinkles)  Fill in any extra chocolate icing needed to cover up the exposed cupcake.


Finally with an icing decorator with a flat tip you can apply white icing in strips to create Lightning's eye windshield, side windows, and mouth.  I also used it to make a "3" in the back.  


Next I used a pointed tip to create the lightning bolts, headlights, and Happy Birthday in the back with yellow icing.


Finally, I used two blue plain M&Ms to create Lighting's bright blue eyes and dotted some chocolate icing in the middle to bring him alive.

Everyone loved this little guy and every part of him was edible.  I spent only $2 on the two cake mixes and $3 on the icing.  I had the sprinkles at home along with the food coloring.  So it only cost me $5 to make an amazing 3D cake that could have cost a lot more at a cake shop.  We served well over 20 people with this cake plus had extra cupcakes from making the "wheels".  I hope you can enjoy re-creating him yourself for your special Lightning McQueen fan!!!

Wednesday, September 28, 2011

French Bread


I've been on an interesting bread baking kick lately and wanted to learn how to make my own French bread.  I found this recipe online on allrecipes.com and it was highly rated.  It turned out awesome but it's not a processed to be rushed.  The recipe said it should only take about 2 hours and 40 minutes to make, but after 3 hours and 45 minutes I felt like was rushing it along in order for my family to have it for dinner.  So start this process early and give the bread proper time to raise.  This recipe has a great crusty outside and chewy inside.  I made two loaves so that I could freeze one and eat one fresh for dinner that night.


Ingredients:

6 cups all-purpose flour
2 1/2 (.25 ounce) packages active dry yeast
1 1/2 teaspoons salt
2 cups warm water (110 degrees F/45 degrees C)
1 tablespoon cornmeal
1 egg white
1 tablespoon water 


Method:


In a large bowl, combine 2 cups flour, yeast and salt.


Stir in 2 cups warm water.


Beat until well blended using a stand mixer with a dough hook attachment. Using a wooden spoon, stir in as much of the remaining flour as you can. 


On a lightly floured surface, knead in enough flour to make a stiff dough that is smooth and elastic. Knead for about 8 to 10 minutes total. Shape into a ball.


Place dough in a greased bowl, and turn once. Cover, and let rise in a warm place until doubled.


Punch dough down, and divide in half. Turn out onto a lightly floured surface. Cover, and let rest for 10 minutes.


Roll each half into large rectangle.


Roll up, starting from a long side.


Moisten edge with water and seal. Taper ends. 


Grease a large baking sheet. Sprinkle with cornmeal. Place loaves, seam side down, on the prepared baking sheet. Lightly beat the egg white with 1 tablespoon of water, and brush on. Cover with a damp cloth. Let rise until nearly doubled, 35 to 40 minutes.


With a very sharp knife, make 3 or 4 diagonal cuts about 1/4 inch deep across top of each loaf. Bake in a preheated 375 degrees F (190 degrees C) oven for 20 minutes. Brush again with egg white mixture. Bake for an additional 15 to 20 minutes, or until bread tests done.


If necessary, cover loosely with foil to prevent over browning. 


Remove from baking sheet, and cool on a wire rack.