Showing posts with label birthday party. Show all posts

Tuesday, April 3, 2012

Fish Pull String Pinata - Inspired by Me, Made by You

An absolutely adoring friend of mine got inspired by some of my homemade pinatas and along with her children made this super cute fish pinata!!!!!

I am so excited to be able to help others create such super cute party decorations/activities, so now I want to hear from any others of you who have been inspired by the pull string princess castle or my Lightning McQueen car to send me your photos so I can feature them on my blog!!!!

As much as I like to make things, it's so much fun for me to share the things you like to make as well!!!!

Email your photos and stories at corrina_dea@yahoo.com.

Tuesday, March 13, 2012

Doggy Bowl Goodie Bag

For my daughter's 5th birthday she wanted a puppy dog party.  To kids the gift bag at the end of the party seems to be one of the highlights I thought up something super fun, easy to make and not very expensive, but loaded with lots of goodies.


I started out by finding some really cute little colored "doggie" bowls and personalized them with our guest's name.  I got these fun little plastic bowls at Walmart for about $0.98 each.  I thought about painting the bowls but using a simple black permanent marker was so much easier and faster.  I also added a fun little paw print next to their name.

Next I created the little "doggy" treat bags to go inside the doggy bowls.  I made Puppy Chow and Doggy Biscuits (bone shaped sugar cookies).  I put each of the different homemade goodies in ziploc snack bags.
For a little extra something special on the goodies, I made little label tags made out of puppy print paper.  I printed out the text, cut around the text with just a little border and glued it on the puppy print paper (found in scrapbook section at Hobby Lobby).    I cut the puppy paper to be the same width measurement of the snack bags.  Next I glued the puppy print tag on colored paper and left enough space to create a 1/4" color border.

Next I stapled the labels on the top of the snack bags.

The doggy biscuits and puppy chow treats turned out super cute.  Now if you can't make homemade goodies you can use the Scobby Do graham cracker treats that are shaped like dog bones.

Also inside the bowls I found some doggy print balloons, some mini sized play dough, and a Toy Story brand mini Slinky Dog.  Overall I spent about $3 per goodie bag.  I used simple gallon sized plastic baggies....the ones that you need a twist tie to close up.  They are really nice to use since they don't have any writing on it like other branded bags.  They also gave me the option to use a fun puppy print ribbon to close up the bag and tie all the goodies in together.

Friday, March 2, 2012

Puppy Dog Cupcakes

For my daughter's 5th birthday, I handed her my "Hello, Cupcake!" book and asked her to pick out some special cupcakes that she would like to have for her little birthday party this year.  Of course she picks the cute little puppy dog cupcakes on the cover of the book and decides she wants a puppy themed birthday party.  I used a few different things to decorate these cute little "pup"cakes that what was in the book they turned out amazing and weren't as hard as I thought they would be.
Ingredients and supplies needed:


  • 1 box cake mix and extra ingredients according to package
  • 1 container pre-made white frosting (or chocolate if you want brown puppies)
  • mini marshmallows
  • red/pink colored sugar
  • pink or red plain M&Ms
  • mini chocolate chips
  • Pull and Peel Twizzlers (for dog leash rope)
  • regular sized cupcake papers (white)
  • mini-sized cupcake papers (white)
  • 1 quart plastic baggie
  • Cellophane tape
  • Scissors

Method:

Make up cupcakes according to the directions on the box.  A regular cake mix will make up to 24 full sized cupcakes, so you can make up 12 regular sized cupcakes and 12 mini cupcakes and use the rest of the batter to make up more mini ones or regular sized ones.  I made up more mini ones and just made faces on them and not full bodies.

Let the cakes cool fully before you begin frosting them.


The first step was to cut 12 mini marshmallows at a diagonal with kitchen shears.  If you dip the shears in water before cutting the marshmallows they don't stick as bad.  Next pour some of the pink or red colored decorating sugar in a small bowl and dip the sticky cut edge of the marshmallows into the sugar.


Prepare the icing bag by wrapping one corner of a quart sized bag with 6 layers of cellophane tape (Scotch tape).  Fill the bag with the frosting from your pre-made frosting and squeeze the air out and seal the bag shut.


With a sharp pair of scissors, clip an upside down "W" in the tip.


Squeeze a little bit of frosting on the flat side of the marshmallow ears.


Then stick them in a proportional spot on the top of a mini cupcake.  Put two ears near the top and then use a whole mini marshmallow to stick on as the nose.


Now pipe on frosting down the edges of the ears on both sides and in between.


This is what it will look like from the front when you get the ears covered....now for the front of the face.


Starting from the top just under the ears pipe down and to the sides of the face on each side to cover the face. When you get to the nose, start at the top of the marshmallow and pull down the sides of it and towards the outside of the cupcake.  You can kind of poke at the frosting all around the face a bit to create more of a spiky affect to the "fur."

Finally, you can put two eyes and nose on with mini chocolate chips.  I used an M&M for the tongue and pushed that in under the mini marshmallow nose.  Set that aside while you make the body of the puppy.


On a regular sized cupcake, start by pulling down about 1" ribbons of frosting that radiate all around the outside of the cupcake.


Then fill in the middle part of the cupcake with ribbons of frosting and then with the same poking action at the frosting with the piping bag to make a more spiky appearance to the "fur."

Now you can place the mini cupcake with the puppy face on it's side on top of the puppy body cupcake.  

You can put piece of liquorish on the side of the neck and drape to the side for the dog's lead if you'd like.


To store the cupcakes until the party, I put them on a large baking sheet and set it inside a box that could be covered.  I would recommend refrigerating or freezing the cupcakes a little bit right after frosting them to help firm up the frosting.  I would also beware making these if you are going to serve them in any type of really warm temperatures because they may melt a bit and cause the puppy heads to potentially slide off (past experience with other cakes). Normal room temperatures should be fine for holding their shape.  As you can see I also made up just faces on some of the leftover mini cupcakes and served these to the mommies at the party.

You can also use food coloring to make the frosting different colors for different colored dogs or use chocolate frosting for darker colored puppies.  I stayed with plain white as my daughter's favorite little puppy toy is all white as well.

Thursday, September 29, 2011

LIghting McQueen Birthday Party


For my son's 3rd birthday he wanted a Lightning McQueen themed party.  We decided to host his party at the local park because it had great play equipment for all ages and great FREE shelters to utilize.    We decorated the shelter with some posters I drew up and painted for the special day and bright red balloons.

We covered the tables with red plastic table clothes and put a checkered flag twisted streamed down the middle.


For gift bags for each of the kids, I used ordinary brown lunch sacks.  I then drew and painted the Cars logo and wrote in each of the kids' names on the bag.  


Each sack was filled with a personalized rice crispy treat, a Cars fruit snack treat, some sweeties, and a self made packet of sidewalk chalk.  


The key component to this party was having the Lightning McQueen cake.  I looked online for ways to make a 3D one and they all used marzipan to cover the cake and I just didn't want to mess with that.  I made this cake with one 9x13 cake and 4 cupcakes.  For the body of the car colored my own vanilla frosting with about a half a bottle of red food coloring.  I used chocolate frosting on the cupcakes and sprinkled them with black colored sugar.  Then used white and yellow tinted vanilla frosting with an accent decorator to do the embellishments.  Lightning's eyes are blue M&M's with dots of chocolate frosting on them.    See step by step how I made my Lightning McQueen cake.


On the back I wrote Happy Birthday, and instead of Lightning's signature 95 number I put the number 3 since it as a 3rd Birthday Party.


Most of the time we let the kids have free play since we were at that park but I did have a few activities planned.  One of them was pin the headlight on Lighting McQueen.  I drew up this little poster and painted it with craft paint.  I mounted it on some heavy duty cardboard and stapled it to the shelter's post.   We also played an English favorite - Pass the Parcel.  I wrapped up 15 pieces of candy in separate layers of a package and the children pass it around in a circle.  When the music stops, the child holding the package gets to open up one layer and get a sweetie.  The game keeps going on until the prize in the middle is unwrapped.  We also attempted to have some water balloon games but with kids (and adults) that can be quite unpredictable in nature so it turned into more of a water balloon fight instead which was great.


Of course a birthday party wouldn't be complete without a pinata and in true "Corrina fashion", I decided to make my own Lightning McQueen pinata instead of spending $20 for one.  I like the pull string pinatas because then I don't have to worry about people swinging baseball bats around.  Unfortunately, the second string pulled opened up the pinata and my son went for the plastic baseball bat anyways and started wacking away at it to empty out the goodies.  Click here to see step by step how I made the Lighting McQueen pinata.

For food, we went really simple.  Since the party was from 4PM on we decided to cookout at the park. We brought down our own gas grill and cooked up burgers and hotdogs.  I made up a crockpot of a mixed bean salad, a bowl of crab salad, cut up fruit and veggies with dip, and chips.  For sweet goodies we had red (Lightning), blue (The King) and green (Chick Hicks) decorated sugar cookies along with our Lightning McQueen cake and some extra cupcakes!

It was a great party and we really lucked out that the weather was warm and comfortable and sunny with a few clouds.  Contingency plan would have been to try having it at our house, but my extra prayers to God sure paid off on this amazing day!

Make Your Own Lightning McQueen Pinata


I made this Lighting McQueen pull string pinata for my son's 3rd birthday party.  I had seen ones in different stores any where from $18-22, but I was able to make this one essentially for FREE as I only used items I already had around my house.  Let me tell you how I made it....

Materials:


Car body:
1 cereal box (I used the smaller sized Kix box)
1 Kraft Mac and Cheese box
1 small gelatin box
1 styrofoam meat tray
1 Crystal Light plastic oval container
4 empty rolls from packer's tape
left over packers tape
black marker
heavy duty scissors

Paper mache:
newspaper cut in 1" strips
1 part flour
1 part water

Decorations:
Red craft paint
Black craft paint
Yellow craft paint
Roll of red streamers or crepe paper
scissors
glue
a few sheets of white paper/card stock
cellophane tape
20 - white 1/4" wide ribbon cut at 36" each 


 Directions:


Line up the tape holders on the sides of the cereal box where you want the wheels to be placed.  Use a permanent market to outline on the side of the box.


Then using the tape rolls I marked out on the bottom of the box how deep in I wanted the wheels to go.  I also mark out 3 sides of a square in the middle of the box for your trap door.   


Then I cut along the lines. I saved the intact cut outs for the wheels and continued to cut around them to create circles to later use for the side walls of the tires.  Next I used an exact-o knife to cut the trap door. You don't want to trim this up any as you need a good tight fit on the door so the sweeties won't fall out later.


Next to get some curve in the front I taped on the Crystal Light container.  To create the top of my car and front windshield, I propped the styrofoam meat container on top of the gelatin box and taped that into position.


Next I loosened the ends of the the mac and cheese box to be able to bend it into a parallelogram.  I taped it into that fixed position with some extra packing tape.  This is my back spoiler for the car.


I tape the spoiler into position at the back of the cereal box.  Next I filled some of the empty gaps between the meat tray and the mac and cheese box and in the front windshield area with some scrunched up newspaper.  (Not pictured here: but I did build up some humps on either side of the hood to give Lightning a little more curve.  See below in paper mache picture to see curves). Then I used some more packing tape to smooth out the lines around the car a bit.

Next I cut up loads of 1" wide newspaper strips and made up a 1 part flour: 1 part water paper mache mixture.

I dipped the newspaper strips in the flour/water mix and scrapped it off.  Then laid the strips across the box to really smooth out Lightning's body.  This step might be a bit overkill, but I wanted a smooth surface to paint my undercoat of red and it strengthens up all the little pieces put together to make the car's shape.  Plus it helps to strengthen the underside of the car where all the cutting out was done.  I propped this up on a colander on some newspaper to help keep it off the table.  Let the paper mache dry overnight for best results.

Next I painted the whole car a cherry red color with regular craft paint to help cover up all the newspaper and help have a base color when I put on my frilled streamer paper.  Let the paint dry as directed on your paint.  You could also use red spray paint, but the craft paint is what I had at home.  Also pain


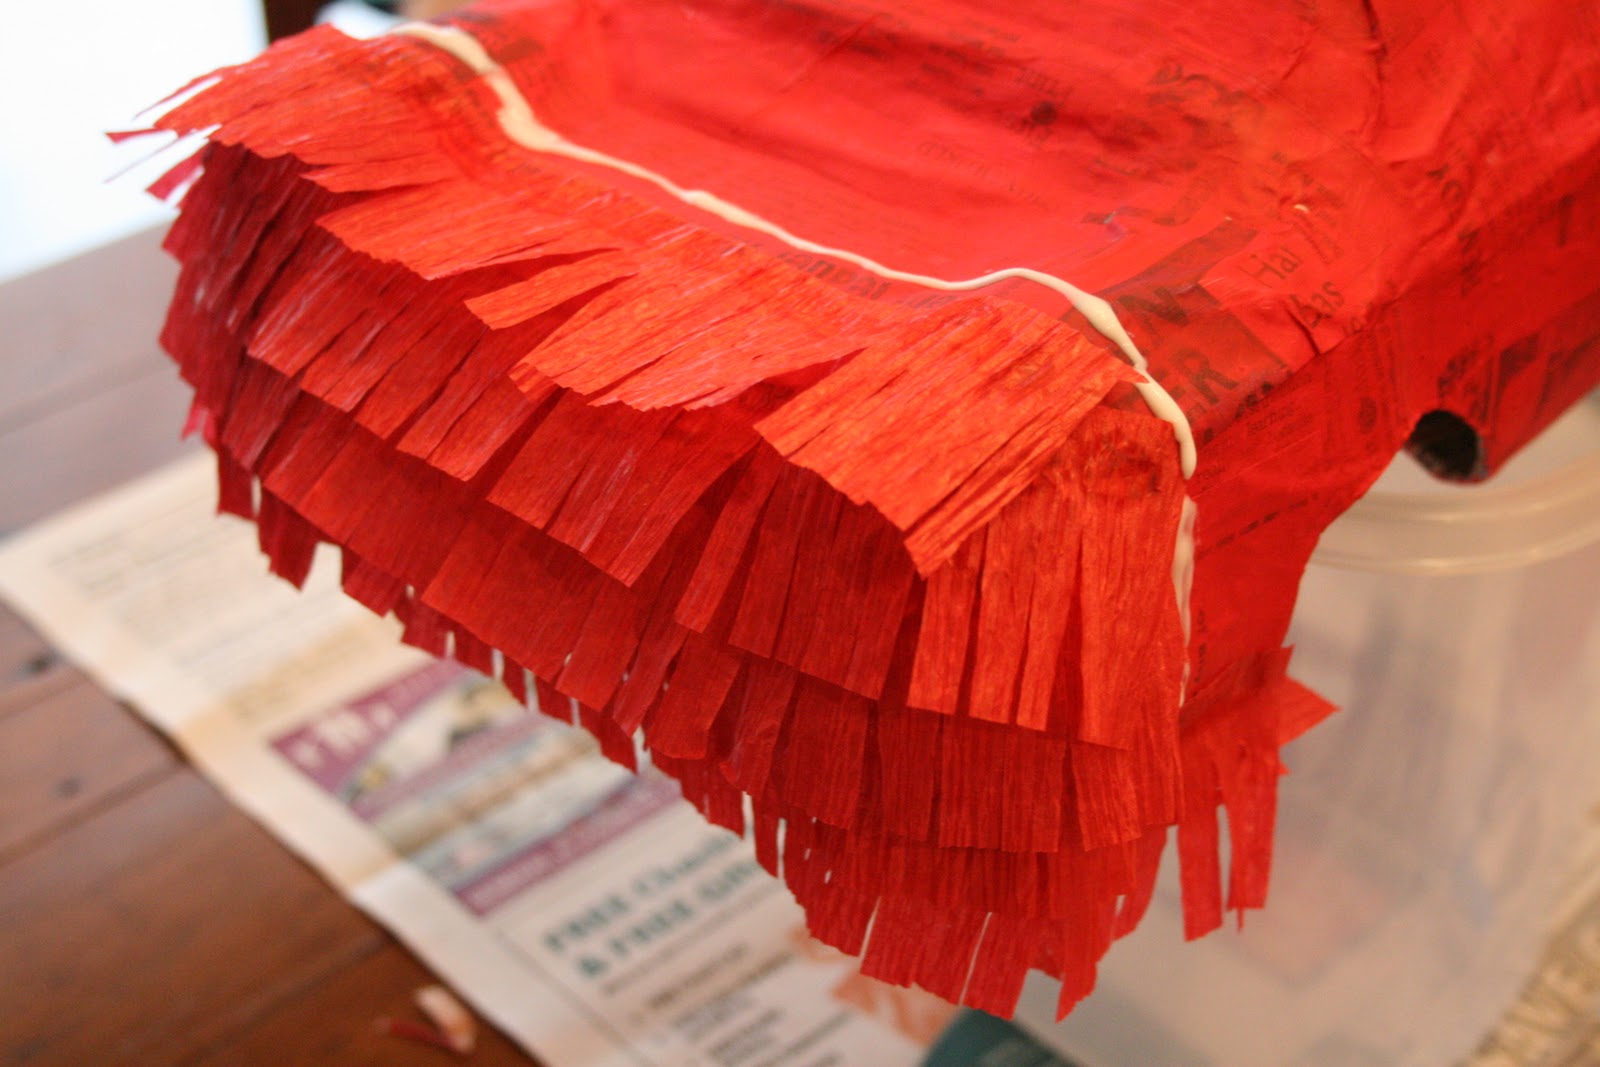
To make the frilled paper to cover the car with, I took a roll of red crepe paper streamers and folded it over on itself about six inches long.  I would it over about 6-8 times and then cut it off.


Next I would cut about 3/4 of the way up about 1/4" wide slits all the way across the paper.

I started underneath the car I started by running a bead of glue across the width of the car and then attached a strip of the frilled paper and cut if off at the side.  Then ran another bead of glue about 1/2 above the last strip and attached another piece.


I continued this all the way up around the front of the car, on top of the hood and rest of the car.  

Once I got to the back of the car I turned the frilled edge around so it would point downwards opposite the way the rest of the car was.  I continued it down and underneath the car to the trap door opening.


To prepare the pull strings on the trap door I started with the real pull string.  I poked a small hole in the trap door near the edge.  I thread the string through from the inside of the trap door out and tie (may have to double tie) a big knot to keep it in place on the outside.  

Then I secured the real pull string back into a random position and secure it down with a small piece of cellophane tape.  Then with the rest of the other "fake" strings, I attach the very ends of them with a small piece of tape in a nice line along the trap door.  Make sure that the little pieces of tape don't overlap each other so they can be pulled off clean and not affect any other strings.  


Also allow about 3/8" - 1/2" between the taped rows so that you can glue down a small strip of the frilled paper to help disguise the strings.    This is a little bit of a tricky step so I wanted you to just be aware of it when you try to do it yourself.  When all the strings are attached turn the car upside down and grab the strings, trim them off at the bottom so that they are all even.


Next I attach the wheels that I created by filling in the tape rolls with newspaper.  I took the cardboard cutouts and glued them to the outside of the wheel while taping the back side of it closed with newspaper inside.  Finally I painted them black and let them dry.  


Now that the car is covered with red frilled crepe paper and the strings are in place you can glue the wheels in place.


Now for the finishing touches....  I drew out the side lightning bolts, Lightning's face, and headlights on white paper and painted them.  Once they were dry I cut them out and glued them on to the car.


I painted the red hub caps on the outside of each of the wheels.


I poked two small holes on either side of the car just above the front wheels.  I fed through some thin yellow twine about 5 foot long.  Then in the back I poked some tiny holes through the back spoiler to feed through a 3 foot piece of twine and tied it in a knot with the rest of the length to tie up with the front piece to make a pyramid point at the top to later attach the main rope to when it comes time to hang it up.  I also had a CARS sticker book that I found the Rusteeze, 95, and lucky lightning bolt to put on the car, but you could draw and paint these as well.


Finally, fill up the car with sweeties.  I had enough room for about 2 lbs of a candy mix. 

When it comes to party time, attach a thicker rope to the connected strings and hang it up over a rafter or a tree branch, etc.  Have the children line up and pull off one string at a time until it opens up and sweeties drop from the sky.