Showing posts with label sewing projects. Show all posts

Sunday, February 10, 2013

Oversized Cloth Checkerboard

My family likes to eat at Cracker Barrel and when it's nice outside we usually play a game of checkers out on their front porch after dinner with those big oversized checkerboards. Well I got inspired one day that something like that would be a great gift for my dad and father-in-law for Christmas.  They both like to play games and I thought something like this would be great to play with their grandkids as they are just getting old enough to understand the rules of the game to play.  Of course I'm one for a challenge to "make" it myself instead of buying it, so I came up with a design and created customized cloth checkerboards for them.  I love how they turned out because they were big and soft, it was less likely to get banged up and checkers to be stepped on if they got thrown all over the place.


For my father-in-law I made an Iowa State themed board with navy and red felt checkers.  Now I was pretty limited on the amount of Iowa State fabric I had so the red squares are kind of random with the logos on them, but if I had plenty of fabric I would have lined up the IA State and Cy in the middle of the squares.  It was my first attempt at "quilting" and found that it is very tricky making 64 perfectly square pieces and sewing them to be all the right sizes to line up together.  When I was done attaching all the pieces together I ironed out all the seems and ironed on some light weight interfacing to the back.  Then I added a square backing piece and made some quilt binding to finish off the edges.  I wanted to order oversized checkers but couldn't get them in time for Christmas so I cut out double pieces of felt and used Tacky glue to attach them together.  This made them nice and thick plus the glue hardening helped add some rigidity to the pieces. 


My dad is a big hunter and lives in a log cabin so it was only appropriate to make his board camo and blaze orange.  The second time around I got a little better at things and got my technique down a little better.

They were a big hit and the kids LOVED playing with their grandpas!

Thursday, April 5, 2012

A Set of Crayon Totes Head "Down Under"


A wonderful lady from Australia bought my red tractors crayon totes on Etsy, but she had two other children that she wanted totes for so I made up two more for her.  This is my first order from overseas and I am very excited!!!


She requested one themed with fairies and the color pink, so I found this really cute Tinkerbell fabric which was purple and then lined the inside and the edges with a bright pink fabric.  So perfect for her little girl.


Then she wanted one with construction trucks on it for her other little boy.  I had a really tough time finding construction equipment fabric in any of the stores right now, but luckily I had this fun print still in my piles of fabric at home.  Totally cool for a little Aussie boy!

Tuesday, March 27, 2012

The Big Girl Quiet Book

I had a wonderful lady from North Carolina contact me to make her a quiet book.  She loved the ones I had made but had also already fell in love with another book that she saw someone make online.  She asked if I could replicate the book for her and I took on the challenge.  Unlike other books that I've made in the past this book is much bigger - 30"x 11" when it is open fully.  The pages are all made from different patterns of fabric with firm interfacing attached on the back sides of the fabric to make a firmer feeling page.  The book is suited more for older little girls (4 + years old) and full of super cute girly fabrics and activities.


This super cute hot pink high top sneaker let's you practicing tying up those laces.


This world traveling dolly has loads of fun clothes to dress up in.


This cute little house has clear plastic pockets underneath it's windows and door to hold pictures of a little girl's family.  Also the mail box holds a letter with a special message on it.

(house with plastic picture holders that allow you to change out pictures as many times as you like)


(on the other side of the letter says "To You")


These frilly flowers in pots button off and on.  And the bouquet of balloons snap off and on.


These were my two most time intensive pages and most expensive to make.  The left side is an "I Spy" quilt which have 1" squares holding magnets that match up with another square underneath.  So all 30 pieces can be taken off and stuck back on their matching squares.  To get the squares to stick securely enough I had to use higher strength magnets (3/4" #6 magnets) and then I used a piece of crafting tin attached underneath the patchwork quilt sewn on the page.  With my new sewing machine I'm not supposed to get magnets near it with the computer in it so I had to hand sew all the little squares closed after I glued the magnets inside.  The carrot field on the right is so fun...but I had to hand sew the numbers on it and hand sew the pieces as well as the little green floss on top for the greens.  I love my new sewing machine because it can do lettering and I made the little carrot sign next to the garden with that feature.


Finally this book has a cute little piggy bank with a purse underneath to hold all the precious little coins as they slide in the top of the pig and come out a little hole on his underside.

The outside cover is a vibrant pink striped pattern with handles and it almost looks like a little portfolio book and can easily be carried around by the special little girls who are going to get to call this precious and fun book their own soon.


******If you are interested in me making you a custom quiet book, I work very hard to re-create anything you find and don't want to necessarily tackle on your own.  Email me at corrina_dea@yahoo.com or contact me through my Etsy shop "Things I Like 2 Make"


Thursday, February 23, 2012

Little Boy Costumes

Last year for Christmas I wanted to make my son some of his own "boyish" dress up clothes so I borrowed my little neighbor boy's (Jack) costumes to make up my own patterns.  I pretty much laid out his costumes on white packing paper and traced around the shapes of the different parts of the costume.  Then I attempted to allow about 1/2" seam allowance.  Not everything turned out perfect but pretty darn good for some new dress up clothes.  This is what I came up with for my little guy.


Peter Pan or Robin Hood 


Knight in tunic with hat


Pirate with sash


All decked out with skull and cross bones

Tuesday, February 14, 2012

Baby H's Little Quiet Book

For my dear friend Diana's baby shower, I made little baby "H" a quiet book.  This cute little book is smaller than my normal books - about 9"x 6" and has 8 fun pages for Diana's first little baby to enjoy.


These colorful felt flowers button on and off.


The three happy balloons velcro to the page and can be arranged over and over again.
The pocket is from an old skirt of my mom's actually and I added a new colorful button and outlined it with a matching color.


This peek-a-boo page has for fun little swatches of novelty fabric under each felt flap.
An old favorite of a fuzzy little teddy bear sleeping under a quilted bedspread.


I updated my stoplight page to put the STOP, WAIT, and GO on the colored lights.
I love making the weaving page...it's bright and colorful and can keep little ones busy.


Finally a little striped coat to zip up.  With my new sewing machine I got to add some fun stitches around the coat to give some extra "flare."
And as you can see I used the blue owl fabric I used on a previous book...when the baby is actually born I'll get to put it's name on the book for that something extra special.

I do have plans to make some of these smaller sized books to sell on Etsy soon as well!!!!

Sunday, January 29, 2012

Omegen's Quiet Book


Here is another lovely quiet book that I got to make for my dear friend in England to give to her first grand niece Omegen.  I made a very simple cover from fabric with tiny little flowers and then added a nice big pink flower in the front.  My friend picked out some of my favorite classic pages for me to make this book.


I had so much fun making this for little Omegen....I hope you enjoy looking at it as well.


Monday, December 19, 2011

My Daughter's Christmas Dress


This is the dress I made today for my daughter to wear for Christmas.  I took this picture kind of late at night because I was just so excited to get it done.  The picture makes it look pink but it's really a scarlet red.  I used Simplicity 2320 to make this long sleeved dress.  I also plan on making her a cap sleeved summer dress and a 3/4 length dress from the same pattern.


I used some gold, red, and black braiding on the top to give it that perfect holiday flare.

Friday, December 9, 2011

Quiet Books I Made for Etsy

If you didn't get to see them when I had them posted on Etsy.com, here is one of the quiet books I made to sell.  I was so pleased when all three of my books sold within the first week of me listing them.  After the first of the year I plan to make several more to list on the site as well.  

This time around I did use the top 10 pages that people helped vote on for me and then I came up with six more new pages - What's Under the Flaps?(lift flaps to find 12 fun patterns), Brush your Teeth, Snap the Trunk (to hold the dress up child with), Put Your Coins in the Bank (piggy bank), Put Your Hand in the Glove, and Weave the Rug.


If you are interested in having me make a custom quiet book please feel free to contact me via email at corrina_dea@yahoo.com or visit my shop on Etsy at http://www.etsy.com/shop/ThingsILike2Make and start a conversation with me.

Wednesday, November 16, 2011

"Give Thanks" Felt Banner


I love making things from felt and it's an inexpensive and fun material to make little banners to help get my house festive for the holidays.  I made this "Give Thanks" banner last year to dress up my fireplace in England and this year it looks great in my rental American house and next year it will look fabulous in my new house that we are building.  I do have to say that it is certainly nice to have little things like this that you can make and put up no matter where you live, so for that I'm thankful for this little project I took on.  Happy Thanksgiving!!!

Materials:

Dark brown felt
Gold felt
Orange felt
burnt sienna embroidery floss
2 yards of 1 1/2" wide coordinating ribbon


How I Made It:


I started out by using Word Art in a Word document to create chunky letters about 1 3/4" to 2" wide and high.  I cut out the letters to use for "GIVE THANKS."


I pinned the letters onto the orange felt.


Then cut the letters out with a small pair of scissors.


Next utilizing a rotary cutter (regular scissors work fine as well), I cut out ten 3"x3" squares out of the gold felt.  Then I cut out ten 4"x4" squares out of dark brown felt.


Then I used a burnt sienna embroidery floss about 4 strands thick and straight stitched the orange letters to the center of the golden felt squares.


Next I continued using the straight stitch to attach the golden squares onto the center of the dark brown squares. I laid out the squares evenly in the middle of the ribbon and attached the brown squares to the top edge of the ribbon with little a "x" in the corners of the brown squares.  Then I ended up with a good 18" on each side to tie up to small tacks underneath my fireplace mantle.  


*Note: You could make the ribbon 1 yard longer if you wanted to tie proper bows on the ends.

Friday, November 11, 2011

Making a Rapunzel Costume and Rapunzel Wig


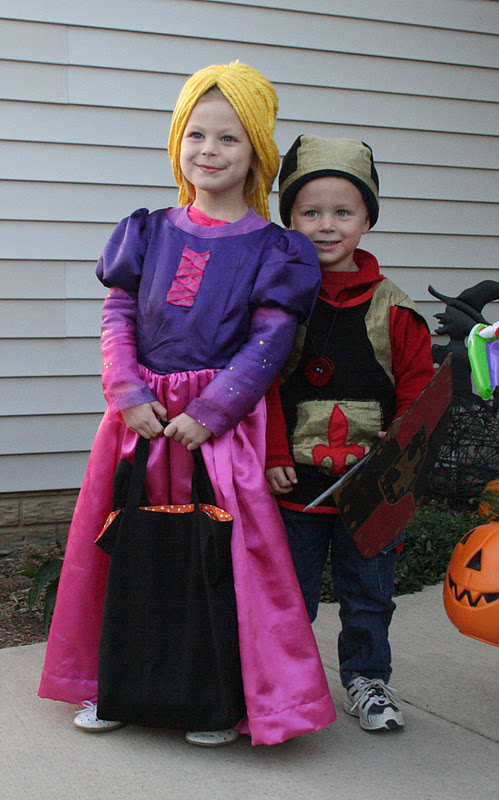
My daughter LOVES the movie Tangled and for Halloween she wanted to be Rapunzel. How fitting it was that my son wanted to be a knight so they had the whole fairy tale thing going on together.  This dress challenged me to no end but it did end up turning out very nice and my daughter absolutely loved it and didn't ever want to take it off.  She picked out the fabric we used and asked me everyday when I was going to finish sewing it.  So here it is along with the infamous long haired wig that she wore for Halloween as well.


I bought the McCall's M6420 pattern to make my little girl's Rapunzel's costume.  Lucky for me that costume fabric was onsale for $2/yard that day as this little dress took over 4 yards of material to make (3+yards just for the skirt part!!!).

The Rapunzel wig was most imperative to the whole costume, so I got pretty creative with this one.  I found a few instructions online on how to make up a child's wig but then I improvised and this is how I made my daughter's wig.

Materials:
  • 1 pair of medium sized panty hose/tights
  • 1 skeen of thick yellow yarn (could have probably used two really but it's what I had at the time)
  • matching thread
  • scissors
  • low temperature glue gun


Here's how I made the wig:


At the top of the panty hose/tights, I measured about 5 inches down and cut about 1" beyond that.  Cutting a small piece of the yard I tied off the end I was holding in a couple tight knots.


Then I turned the panty hose cap inside out.


Next I found a piece of cardboard about 36" long and started wrapping the yard around it.  


I would wrap around about 10 times then tie off the top to make several small hair sections.   I only got about 5 1/2 full sections made out of my skeen of yarn, but if you used more skeens you'd want to aim for about 12-14 sections for a really full head of hair. Holding the tied section, I pulled the hair down and cut the loops to make straight hair.


Using the center seam of the hose/tights for my middle part of the wig, I would sew the middle knots of the hair pieces to the seam of the hose catching part of the knots.  


Each hair section would follow in line down the part line and then separate the hair to either side.  Once I reached the back part of the crown of the head I sewed on my final section and then pull that hair all towards the back.


To help me hold the wig in a good shape I put the panty hose cap over a tall bowl and laid the hair down how I would want it to fall.


Then using a cool temp glue gun, I started gluing down the underside of the hair to the pantyhose cap.  The key thing to remember when doing this is to keep the cap pulled tight and not the hair up from the bottom of the cap about 2 inches.  Because once you glue it in place it won't have any give it in to fit on the person's head.


I ended up gluing down only about the back 2/3 of the hair in order to cover the cap.  This is what it looked like when I had it secured in place.


Once the back hair was secured, I used the front 1/3 of the hair to pull back and create a fun braid.  This helped me be able to create a nice low parting bangs in the front of the wig and get Rapunzel's famous braid from the "Tangled" movie.